Just because you're cold in the winter, doesn't mean you can't be fashionable with something other than scarves, does it? Why not make a tie?

It's cute, it's warm, and it's an easy evening-project!


For the last 10 days I've been working on a crocheted tie pattern, just for you! :) It would've been done sooner, but the pattern got deleted, and I had to start all over again (fun times). Now, keep in mind, this is my first try at making a pattern, and especially making one in English was a challenge for me. So, if something doesn't make sense, then don't hesitate to ask me.
Let's get crocheting, shall we?
Abbreviations:
Ch = chain
Sc = single crochet
Hdc = half double crochet
Dc = double crochet
Tc = treble crochet
St = stitch
Sl.st = slip stitch
Please read the notes carefully.
Pattern note: Turn at the end of every row.
Pattern note 2: I don't mention the length/how many rows to do each stitch, because this is a matter of preference.
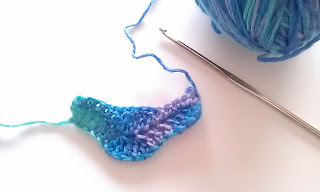
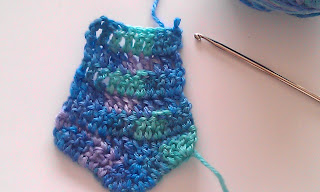
Pattern pictures note: The piece you see in the pictures is a model made to show spesific stitches. It is in no way a preview of your tie.
Additional tip: Since it won't show, for the end of your tie you could use tc, instead of dc. This will make you finish your tie faster, but it won't look as tidy.
Front of tie:
You will start your tie making The Wave-stitch.

Row 1: Ch 16
Row 2: 2 dc in 3rd st from hook, dc in next 3 st, *dc
together next three st* x2 (this will be making the curve), dc in next 3 st, 3
dc in last st.
Row 3: Ch 3, 2
dc in first st, dc next 3 st, *dc together next three st* x2,
Continue this until you've reached the desired length from
your neck to tummy. If you wish to add stripes to your tie, simply change the color of your yarn while working on the Wave-stitch.
After you've reached your chosen length, you will even out your wave.
To even out the wave: 4 sc, hdc, dc, tc, dc, hdc, 5
sc.

Making the 'tail':
*Chain 3 (= 1 dc), dc throughout row, decreasing 1 dc.*
Repeat *-* the next 4
rows, evenly decreasing 1 dc in each row. You should be left with 9 st.

Continue making the tail with double
crochets (without decreasing) until you've reach the desired length of your tie.
Pointed 'tail'tip: Sl.st in first st, sc, hdc, dc, * tc, ch 1, tc*
in middle stitch, dc, hdc, sc, sl.st in last st.
Next row: Skip first st, sl st in 2 next st, 2 sc, *hdc, 1
ch, hdc* in middle st, 2 sc, sl st in next 2 st. Tie off.

To make the boarder, simply single crochet around your tie.
And you have your new tie! Iron it, learn how to tie it, and I hope you ♥ it!


